Weekly blog- 10/06/19 – 14/06/19

Assessment, river project, UNIT 2, Weekly Summaries, Weekly To Do Lists, Work in Progress

TO DO:

  • Upload last weeks weekly blog
  • create short videos of the 3D scanning process and upload with notes
  • work on Symposium video
  • continue working in Ceramics on the clay bones
  • finish 3D scans with Einscan, edit them on Meshmixer, and send as many as pos to print this week

Monday 10/06/19

  • came in for the afternoon and completed another clay bone in the Ceramics Studio, with another almost finished. I also pressed some clay into 3 of the gel flex moulds before I left, so they should be firm enough for me to pull out of the moulds a little easier in the morning
  • I found that working with the clay when it is harder is closer to working with the wax like I am used to so it was a little easier, although I am going to need to pick up the pace if I want to make them all in both the lighter colour clay, and the terracotta. I wanted to make doubles of each too which means more work. I’ve actually lost one of the original bones, and the pieces of jaw have been difficult to cast well, so that means I have 5 bones to display. This still means that I’ll need to make 20 ceramic bones though if I stick to my original plan of 2 of each in both types of clay, which is a daunting task. I think I might end up only making one of each, and if they break in the exhibition then they break, but I’ll have to see what progress I can make this week.
  • I also went to learning zone, to make some process videos, and work on finishing some of the draft posts saved on my blog, and so far I have finished and published 4, plus this post which I will publish at the end of the week

Tuesday 11/06/19

  • Finished 2 more ceramic bones, and have another 2 half done (one of them is frustrating me so I started another one and kept going back and forth between the two)
  • I now have some bones and a few small things made out of the Earthenware Scarva drying on the drying racks, which I intend to fire when Tas next lights the kilns. I may experiment with glazes on the other objects, to see if I want to glaze the ceramic bones or not.
  • Also sent three of the Einscan 3D bones to print, they should be ready for me to pick up tomorrow
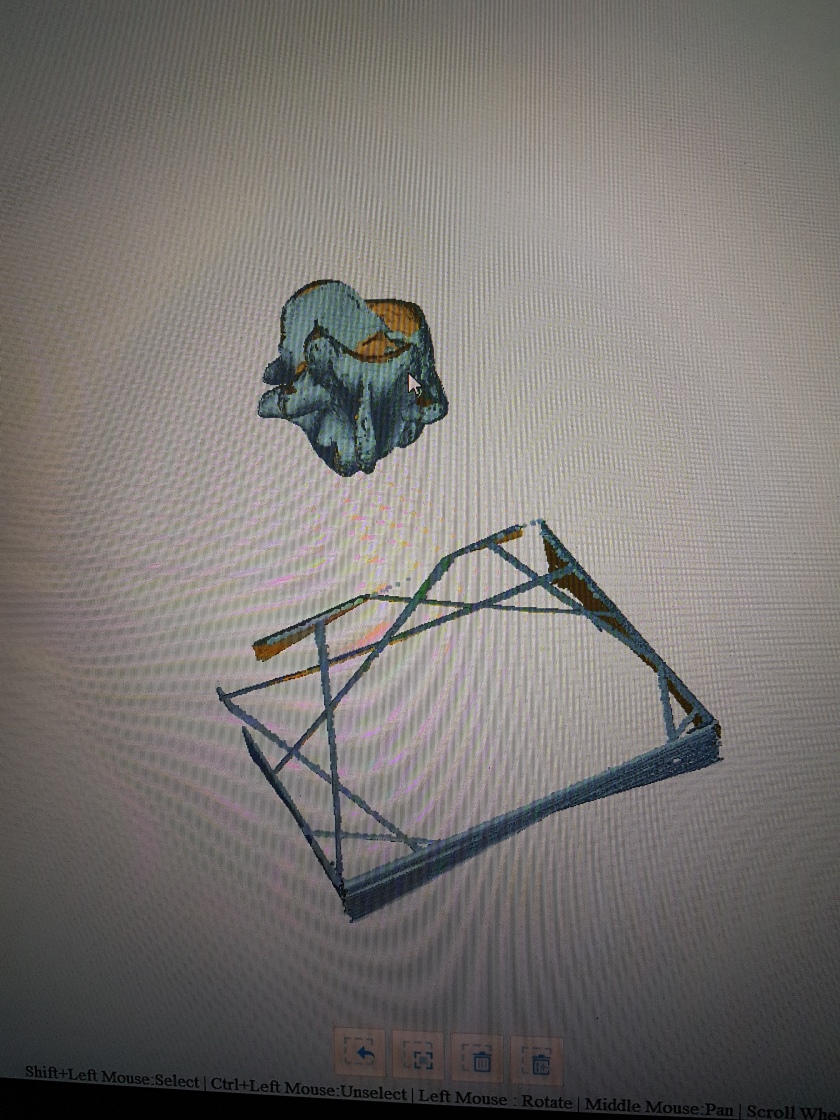
  • Jonathan showed me some tricks on Meshmixer with one of my scans, so hopefully I’ll be able to finish it on my own
  • Picked up the iPad scan 3D print that I sent to print last week, and it looks good- low poly and only the shape, but good as a test

20190611_150836

  • Screenshots of the 3D printing software, Cura, below. You can set the size of the objects here (which I kept the same as the scans, meaning they will be the same size aprox as the real bones) and you can also tell the programme to automatically build supports for your objects which will print with it. We arranged them so that the supports will be touching, to save space and the filament.

This slideshow requires JavaScript.

This slideshow requires JavaScript.

Thursday 13/06/19

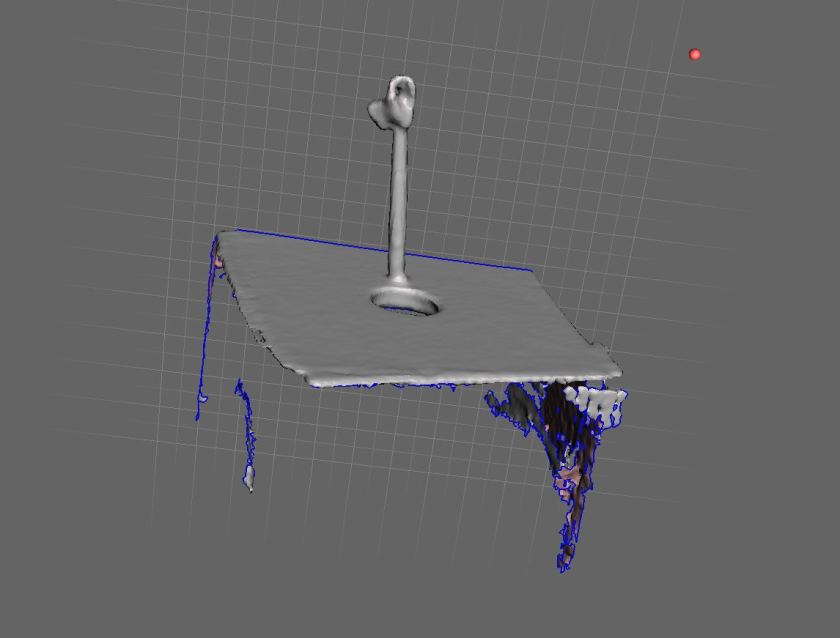
  • Was unable to attend the group session due to illness, so instead I added some more bits to a few drafted posts, including this one, and finished another post. I also had a play around on Meshmixer with the more difficult bone (the 3 I sent to print only needed minimal fixes). I have managed to sort it out a bit, but I think I will need Jonathan’s assistance to get it ready to print. (Screenshots below)
  • this same bone is also proving to be tricky to sculpt, due to how big the inner gap is- it is very easy to squash in the soft clay, and prone to falling apart

This slideshow requires JavaScript.

Friday 14/06/19

  • Finished the clay bones I was working on- I now have 1 of each of the main five, and a spare of one of them which are on the drying rack
  • Spent all day working on those, they should be ready to fire next week

3D scanning with Einscan

river project, UNIT 2, Videos, Weekly Summaries, Work in Progress

I mentioned this new 3D scanning available in the 3D workshop briefly in my weekly summary post, but I thought I should probably do a separate post for it, as it is a really exciting piece of kit that I have learnt to use.

This slideshow requires JavaScript.

The Einscan is a piece of kit and accompanying software for 3D scanning, which Jonathan (tutor) mentioned was now available for use in the 3D workshop during our one to one tutorial. You start by setting up the software and kit, by calibrating it- you put the calibration stand onto the turntable, and follow the instructions on the software- rotating the removable board as shown on screen so that the dots align. You rotate the board three times, and in-between each one the turntable rotates it 360 degrees to calibrate the camera. Jonathan (technician) explained that the scanner builds the 3D model by sending out beams of light across the object- the way the light bends around the object is then captured and is used to build the model. Once it was calibrated we used a glue gun to attach the bone to a clear plastic rod embedded in a small piece of wood, much like when I 3D scanned with the iPad and with the photogrammetry- the rod acting as a support. Most of the bones had to be scanned twice, with the bone moved into a different position and glued before being scanned the second time. Jonathan then showed me how to match the two scans up on the software to produce the finished model. (he showed me this on Thursday last week, which is why I ended up with the mutant bone scan, as I didn’t know how to match the two scans up).

I still have one more bone to scan, and possibly one to redo, but I have made really quick progress with this and I’m really happy with how the scans are coming out! As you can see from the video, the details and texture are being picked up much better than they were with the iPad, although not quite as well as the photogrammetry- however this has a much higher success rate and is much faster, so I think the prints I get from these scans will probably be the final ones I put in the show, which is very exciting! I really want to play with these scans on blender- maybe animating them in some way, and I would also like to play around with scale if I have time- printing them as small as possible, and as large as possible. If I have time for these experiments, and if they go well, I am considering applying for the Selected Showcase at our end of year show- I envision displaying a short animation of the digital 3D models, or perhaps a few still images, alongside some huge and tiny 3D prints of the bones.

To Do: 
– Scan the last bone
– clean the scans up on Meshmixer
– send the scans to print


Experimenting with Meshmixer 05/06/19

UNIT 2, Videos, Work in Progress

Meshmixer Sped up Test from Kat Outten on Vimeo.

After my first attempt editing an iPad scan of my bone didn’t go so well (you could see where I dragged the mesh, and this was visible on the 3D print) I was a bit hesitant to try again. This video was originally a 5 and half min screen cap of some playing around with another bone scan, to get a feel for the tools and how the programme works, which I sped up to 2 mins. You can see me trying different tools and playing with softening the shape, which I didn’t end up keeping.

screen cap bone 2 ipad.JPG

This screenshot shows the bone before any editing was done- the raw scan.

I feel a little more confident to use Meshmixer now, and I plan on cleaning the rest of the iPad bone scans up, just to see how the shapes have turned out.

This slideshow requires JavaScript.

Weekly blog 03/06/19 – 07/06/19

Photographs, river project, UNIT 2, Videos, Weekly Summaries, Work in Progress

Monday 03/06/19

  • Took moulds from foundry down to Ceramics studio and started testing them out
  • The clay is much softer than anticipated- I am used to more solid materials such as the wax, so de-moulding has proven more difficult- the clay loses shape as soon as you try to pull it out of the moulds
  • I found leaving the clay in the moulds to dry a little helped, but not much
  • I only managed to get one clay bone finished; I had to do a lot more work to it than I was used to doing with the wax to get it to look right, using the real bone for reference

This slideshow requires JavaScript.

  • I also popped into the 3D workshop to chat about the new scanner with the technician, Jonathan, and ended up doing a scan of one of my bones then and there

This slideshow requires JavaScript.

Tuesday 04/06/19

  • I booked out the photography studio last week for this morning, to photograph all my sculptures so far, with the help of Richard, the technician
  • Ended up coming back after lunch and staying there til 3.30ish, as some pieces proved trickier to photograph

This slideshow requires JavaScript.

  • I took 360 pics of all the pieces except for the two brick casts and the bronze casts, and I plan to animate them into little gifs for my website
  • I learnt a lot about how to light different shapes and materials, which I hope I can try to mimic at home with a flexible desk lamp, fabric, and a white table or sheet- Richard definitely taught me that you don’t always need the fancy equipment available at uni
  • Didn’t get time to go to ceramics again, as planned, so I went to the 3D workshop to do more 3D scans instead
  • I ended up with a few fixable scans, and one mutant scan- I scanned it twice at two different angles, but the software stitched it together wrong, giving me a mutant bone

20190604_164439(0).jpg

Wednesday 05/06/19

  • Made progress on remaking my Symposium video (I lost the entire thing because the programme I was using crashed)
  • Had to go to work in the evening

Thursday 06/06/19

  • Morning group tutorial- we discussed show details and I am happy with the space I have been allocated
  • Edited one of the iPad bone scans and sent it to print
  • Made some more progress on remaking the symposium video

Friday 07/06/19

  • Visited Jonathan in 3D and scanned the bones that went wrong on Tuesday- he showed me how to do multiple scans and match them up to get a better 3D model
  • I have one bone left to scan- I just need to do that and clean up the scans on MeshMixer and they will be ready to 3D print

SYMPOSIUM 2

2ND YEAR PRESENTATIONS, Assessment, river project, UNIT 2, Videos

I originally made this video for the Symposium 2 for when we were supposed to present the videos to the rest of our classmates, but as I was just finishing working on it (and despite saving the file every five minutes or so) the Mac I was working on crashed and I lost about 4 hours worth of work. This all happened at 4am, 6 hours before we were due to present to the class, and so I ended up giving a verbal presentation with some of the images I used in the video to demonstrate what I was talking about. This was a very stressful and anxiety inducing situation, but I am very pleased that I did it, and that Jonathan and Ed were understanding and allowed me to present the way I did.

This video is a little bit longer than it was supposed to be, and even that was a struggle, as I found I had so much I wanted to show and say. I am fairly pleased with the outcome though, and I feel that it captures my process and research quite well.

Symposium 2 Feedback for Peers

Assessment, UNIT 2

Steph

  • speech was too fast to follow
  • visually very engaging, with a strong body of research
  • is the large scale print necessary? I feel that the wooden jigsaw piece is stronger as it encourages audience participation- it invites them to explore the landscapes in a similar way to how she has
  • the shapes and manipulation of the found imagery echoes how mankind has shaped and manipulated the landscapes around it

Janet

  • painting as a living entity, “painting making”, with each painting having its own agency
  • video echoes the idea of cycles and life, and organic matter growing
  • it would have been nice to see some of her research, and an idea of what she is putting into the final show- one painting? Multiple? Screens? A combination of painting and animations?

Robin

  • the video is beautifully made, but the text was at times hard to read- although perhaps this was the intention?
  • the video shows a great deal of consideration, but I would have liked to have seen your research
  • I really enjoy the aspect of your work that is immersive, interactive and has to be experienced- it opens up art to a wider audience which is something I am passionate about

Gabby

  • making sense of loss through documentation
  • a strong body of photography, film and painting
  • the idea of voyeurism and photography is well considered, and I can feel that you care about being sensitive and not exploitative
  • I can see how your photography skills have developed through the selection of images, and use of colour and composition
  • depicts a universal feeling and a strong sense of empathy, viewers will bring their own narrative and emotion to the work
  • I am interested to see what prints you choose to put in the show!

Arlette

  • clearly explained journey, with a strong feeling of direction
  • I really love the concept of ideas–>practice–>ideas
  • parameters can often feel restricting, but for you the boundaries you set yourself helped you to create a rich body of work- clearly you know yourself and your practice well, and this shows

Kehkashan

  • the video is beautiful, although for me the music is a little distracting- it feels like a strange motivational video
  • community building through art, building narratives through curation and making challenge is curating your work well in the show- you have a lot of work!

Dwa

  • silhouettes, shadows, lack of faces- allowing viewers to insert their own narratives, challenging stereotypes and the idea of identity
  • pushing the pieces further and exploring other media/editing
  • I really enjoyed seeing your research!

Justin

  • sight and sound as complimentary forces
  • the bias in art toward visual over sound and where it came from
  • a strong body of practical and traditional research that compliment each other well, with a lot of technical skill
  • I am very keen on the use of old analogue tech, as it works aesthetically and through the sounds they add (static, ect)
  • very excited to experience the work you put in the show

Iris

  • making emotion physical- becoming data, physical reactions v.s. emotional reactions
  • a really diverse range of experimentation exploring emotions as a concept and how we express them (or not) or repress them

Lyu Wen

  • pushing the boundaries of performance art, with a huge amount of work, varying from serious to silly
  • sense of time and space, in art and in real life- a very strong theme with a lot of research
  • I think you’re really brave to put yourself out in public for your performances

Ben

  • the idea of a digital pleasurescape
  • digital memorials and digital death, data footprints left behind
  • embrace the questions and uncertainty- these should not be feared, as there are many things we may never know the answers to
  • fascinating research and striking imagery
  • The key is how you are going to present your work- screens, prints, installation, ect

Anfal

  • mixed media- photography, text, digital editing, and drawing
  • how different kinds of photographic manipulation change the viewers perceptions
  • the use of your work as a kind of journal is very interesting- I would like to see more!
  • the digital illustrations are colourful and engaging
  • keep testing out and experimenting with layering- take test shots and play around with the layout until you get an arrangement you like

Eugenia

  • amazing that you have tried so many pieces of software and have such a good grasp of them so fast
  • I love your character videos, very humorous and fun to watch
  • rather than sticking images to fake iPhones- can you actually show the works digitally on the screens? I get that trickery is desired
  • I would love to see you come as one of your characters on open night!

Vanessa

  • connection to the physical act of making- printmaking, painting, photography, and drawing
  • empty buildings whilst there are people living in tents, a sense of isolation and emptiness- the photographs work really well as stand alone pieces of work, not just as studies for the paintings/drawings
  • are you going to put the photographs in the show, or paintings? both?

Alena

  • very hard to hear what you are saying the video
  • how will you differentiate between your own work and others in the magazine? If that is the plan?
  • more like a look book as opposed to a magazine? Adds texture and depth- it becomes more of a 3D object than just a magazine
  • how will you present the book? Is it going to become an installation, or will the magazine sit on a shelf/plinth?

Ziyan

  • the act of preserving becomes more important than what is preserved
  • choice of mediums and access
  • diverse range of research and critical thinking
  • can’t wait to see what you install in the show!

Manolis

  • Ai in art and the creation of art
  • AI generated work shown on the screens
  • lots of problem solving and collaborations to complete the work which is very fascinating
  • Jonathan could photograph and measure the bed/chair in the Quiet Room at uni and potentially borrow it? Then he would just need the cushions and headset need to be brought to London

Paola

  • I went to the bathroom and missed your presentation 😦
  • but your solo exhibition looked really cool and your digital skills have come really far over the past two years!

1-1 Tutorial with Jonathan 20/05/19

Tutorials, UNIT 2
  • Presentation of work- which objects and why?
  • – Alejandro- go speak to him
  • Next Wednesday- description on Wiki
  • Whitten timber yard, behind Peckham Library- buy a door blank, white faced or plain and paint it for table, use trestles in studio, project already made river file onto table, then paint river
  • OR use a table top in white from Ikea, £25-£27 depending on size
  • IF I can’t find trestles the right size, Ikea sells table legs for £2.50 each × 4 or thin trestles for £5 each × 2
  • using projector as a guideline to paint river onto table
  • Sound- record sound of walking along the river piped into room, or speakers under the table- quieter, more intimate
  • Need to figure out what audience will sit on- benches or stools?
  • White Ikea stools- £4 each?
  • Instead of putting screens on separate plinths- put one Mac on the table with objects- this COULD encourage audience interaction with the rest of the objects- they will know to sit down and use the Mac because of the mouse attached to it, so this might psychologically encourage them to sit at the table and play with/touch the objects
  • 2 screens- aesthetically pleasing but unnecessary?
  • 1 screen- positioned at the end of the table, facing the back of the room, so that viewers have to come round the table to see what is on the screen, influencing the movement of people
  • Real bones included or not??
  • PROS- the whole idea of perception of the objects and the question of whether people will pick up the real things or the materials they are familiar with?
  • CONS- the bones are very fragile and I an worried they will break
  • Screen capture- the whole show, or just the open night?? When I invigilate? Because the files will be huge, but it can be done on quicktime very easily on the Mac- do I want to code it so that it only activates when someone is using it?
  • Sound- borrow sound recorder from CLS- audio recorder (Zoom or TASCAM) and walk along the Thames where I found the bones- do some tests on my phone?
  • Don’t let the levels get too high on recorder- put headphones in and listen as I record and adjust levels accordingly, get a DEADCAT (fluffy thing for the end of the recorder)
  • Look for audio recording apps for Android?

20190520_11122420190520_111425

The above sketches were made during the tutorial, with the top one being the first sketch/idea and the third being the last and most likely final version.

I can be quite flexible with the space I use in the exhibition, however I would prefer a small space for just my work, so that the sound can be heard and I can specifically observe how the audience reacts to my work.

World Capital at Arebyte

Assessment, Exhibitions, UNIT 2, Workshops

This slideshow requires JavaScript.

As part of the exhibition World Capital at Arebyte Gallery I was asked to come in and run a workshop for the local children, inspired by the exhibition. World Capital explores how cities and city planning has become homogenized due to capitalism and globalization- with newer parts of cities being impossible to distinguish from other cities across the world. The artist, Felicity Hammond, explores this topic through digital collage, and the gallery space was turned into a collaged city, complete with water ways which mirrored the installation and created an almost ethereal space in the gallery.

Globalisation and capitalism are bit much to explain to young children, and we weren’t sure what kind of age range we would attract for the workshop so I decided to focus on the ideas of collage and building a “world capital”. Rather than asking the children to simply sit and do a collage themselves I wanted to push it into 3D, much like the artist herself had created a 3D collage in the space. With this in mind I researched free downloadable nets of famous landmarks, and also some more simple buildings like schools/ect. I designed a file of the river Thames on Illustrator, which I had printed 150cm x 50cm, which we spread out over the tables in the gallery space, and we asked the children to join us in putting together the famous landmarks and buildings with glue and scissors. When they had made a variety of landmarks (with our help) we then asked them to “build their own world capital” by placing the landmarks they had made around the river, to create their own ideal city- complete with pyramids, Big Ben, the Eiffel Tower, the statue of Liberty, and lots of other international buildings!

Rebecca, the curator at Arebyte, helped me to run the workshop and we both had lots of fun, as did the children who came along! They liked it so much that they asked to take the huge river print and all of the buildings they made home with them. I felt that it was super successful, and it is important that art galleries offer fun, free, accessible activities to children- especially children who otherwise would not get the chance (i.e. children from low income backgrounds, children with special needs, act).

This slideshow requires JavaScript.

Some photos of the “World Capital” we built! ^


MENTAL: An Exhibition Exploring Mental Health

Assessment, Exhibitions, Group Project, Personal Projects, UNIT 2


This slideshow requires JavaScript.

20190502_17353020190502_173539

The “BPD and Me” zine I made was made specifically for the exhibition I organized and put together for my society, The Mentally Chill Society.

As part of this I had to:

  • find out if there was interest from members of the society
  • find out what spaces were available at UAL for student exhibitions, then apply for the space (a very long application form was involved)
  • I had to attend a meeting to learn the do’s and don’ts of the space we were allotted- including the health and safety stuff
  • I then got a committee of society members together, they helped me to write the open call brief asking society members to submit work dealing with the topic of mental health, and more specifically their own experiences of it
  • Shridula put together the poster which I emailed out to society members and also posted and shared on social media
  • we then went through the submissions as a committee and contacted everyone who was successful
  • I then had to fill out a risk assessment
  • One of the members, Carmella, designed the poster, which I then took elements from to design the sheet with everyone’s names, courses, and descriptions of their work on for the exhibition
  • I also filled in an application form for additional funding from the Student Union to cover printing costs, costs of nails/tape/ect, alcohol and other drinks for the private view, ect
  • It was a real struggle to get everyone into the space to put their work over the two days we had to install but I managed, and we got everyone’s work hung!
  • There was a lot of problem solving involved- for example we realized too late that the labels were going to be too expensive, so we got number stickers for everyone’s work, and then had the sheet with all the info on it for people to take
  • the private view went really well and I got lots of positive feedback on the curation and for putting it together!
  • this was my first time organizing an exhibition completely from scratch, and my first time curating an exhibition- I learnt a lot about working with larger groups of people, giving up control to delegate tasks, and how to hang work that is vastly different in a way that works and shows everyone’s work in the best way

BPD & Me Zine

Exhibitions, Personal Projects, Photographs, UNIT 2

As part of an exhibition I organised for my society, The Mentally Chill Society, I decided to make a short zine exploring my experiences with Borderline Personality Disorder, which I was diagnosed with around two years ago.
I started by writing down the NHS definition, the causes, and the four main criteria for diagnosis, and began thinking about how they affected me, personally. I then made some notes, shown below, of objects/imagery I might want to use. It was at this point I decided I wanted to create the initial imagery for the zine on the photocopier, as I wanted it to look and feel handmade and erratic.
20190430_144407

I spent about a day in the learning zone, playing around with the various objects I collected from my room on the photocopier, including- fast food packaging, smoking apparatus, my old Barbie doll, condoms, anti depressant packaging, coloured paper, patterned paper bags, doll parts, and photos of myself. These were all things I felt represented different aspects of both myself and more specifically my personality disorder. Once I had the imagery I then used various pens and crayons to create the text and some other parts (such as the mood wheel) which I then added. The original double page spreads were A3 (so once folded it would have been A4) as I prefer to work larger then scale down my work in the next stage, for better quality. The finished zine was printed on A4 paper and folded down to A5.

20190422_214914

The next stage was to scan the pages so that I could edit them digitally on Indesign for printing, as shown below.

I printed a proof in black and white first to check that everything was in the right place, before moving on to printing in colour.

I then hand bound the book, using waxed thread for book binding, a bone folder, needle and awl, to make the holes.

This slideshow requires JavaScript.

The photos above are of the Zine in the MENTAL exhibition that I organised, and set up, which I will post about shortly.