Antidepressant Monoprints

Personal Projects, Work in Progress

I made these monoprints back at the beginning of lockdown, to open up a discussion about the side effects of antidepressant medications, based on my own personal experiences with Fluoxetine, Citalopram, and Venlafaxine. I finally got round to scanning them and doing minor Photoshop edits (a little bit of resizing).

These are not all the possible side effects of these medications and aren’t necessarily the worst, but they are some of the ones that I have struggled with the most- and some of which I didn’t actually realise were side effects of my medication until I did further research. I would potentially like to expand this into a zine for people who are considering antidepressants- often medication is forced onto patients instead of therapy or delving into the reasons why people are feeling the way they are, and in a short 10-20 minute doctors appointment we are assessed (sometimes wrongly) as having depression and are given a prescription with very little explanation as to why they are being prescribed and the affects they can have on your body and mind. I personally have found medication helpful, but I think people need to know the full facts before deciding whether or not to take something. I am also considering redoing the monoprints over the top of the paper inserts that come with the medication detailing the side effects as a development, as I see these very much as a starting point.

Further GIF Experiments

Personal Projects, Work in Progress

3d_gif_attempt-Recovered.gif

3d_gif_attempt-Recovered1katoutten_gif1katgif

Making a gif banner seems a bit hit and miss- the lowest down one is the best one I’ve managed to make so far, but I’m still not 100% happy with it so I’m going to keep experimenting until I get it right. Also it turns out RedBubble only accept PNG or JPEG for their site banners so I’ll have to do something else for it.  I do want to get to grips with this process though and I would like a new gif banner for this blog, so I will keep tinkering!

Work Placement at The Kiln Rooms

ceramics, The Kiln Rooms/Ceramic works, Work in Progress

I am currently part of the work placement programme at The Kiln Rooms, a Peckham based ceramics studio with 3 sites around Peckham. They offer classes and open access ceramics studio spaces for members and as part of their work placement programme I work for them 7 hours a week, during which I am training on the job as a ceramics technician. This includes learning about the kilns (how to load, unload and operate), mixing glazes, learning about different techniques and types of clay/other materials, and the general upkeep and day to day running of the open access space in Bellenden Road. As part of this I have free access to the staff studio space 24/7 in Peckham Levels, and free kiln and glaze use. I started there on October 6th and have been working on a few of my own smaller projects since being there, using the staff space before and after shifts at my job in Peckham. I hope that this opportunity will allow me to grow my practice as I don’t currently have a lot of experience with ceramics- I hand sculpted the ceramic bones for the River project during my MA but didn’t get to learn much in terms of techniques or the potential of ceramics as a medium as I just sculpted the familiar shapes using the same kind of techniques as I used with the waxes I made as part of the bronze casting process, and as I used to with polymer clay (which I worked with as a hobby in whilst in school and college).

I have already learnt a lot in the past few months since I started there; regarding the technical side of things like mixing glazes, kiln temperatures, the correct way to pack and unpack kilns depending on if it is bisque or glaze firing, and other bits like this. I think my main goals moving forward are to improve on these skills and gain more knowledge, and I also want to learn how to throw properly on a wheel and how to slip cast. I have a lot of experience with mould making in other materials, so I am looking forward to trying my hand at various kinds of plaster mould for slip casting- I have some ideas that involve lots of objects of different shapes and sizes that I want to cast in ceramic so it should be a good opportunity for learning and experimenting! I also want to learn how to throw properly- I have had a few attempts and so far have only completed one very tiny little pot. It turned out to be much harder than I thought it would be, so I need to watch some more tutorials online and keep trying.

This slideshow requires JavaScript.

Above: photos of my first attempt on the wheel, my first pot before drying, and then a photo of it after the bisque firing. I have also glazed it since then and need to add a photo of it. For a first attempt I am pleased with it, although I think I may need tutoring or classes in order to learn to throw properly- whilst I like the shape of the pot it is much smaller than I was intending, and it is wonky where the clay wasn’t centered properly.

I’m also keen to try and get back into jewelry making, so I have been experimenting with shapes and form to create something (hopefully) different and interesting!

This slideshow requires JavaScript.

Above: exploring forms through jewelry, showing the initial forms, then first firing, glaze firing, and final glazed pieces.
I want to try and make more delicate forms as these are quite clunky and I also need more practice with glazing. As well as this I have purchased thinner rods for the pendant stand shown in the photos because I’m not happy with how large the holes are on each piece- I feel it isn’t as aesthetically pleasing.

img_20191219_000538

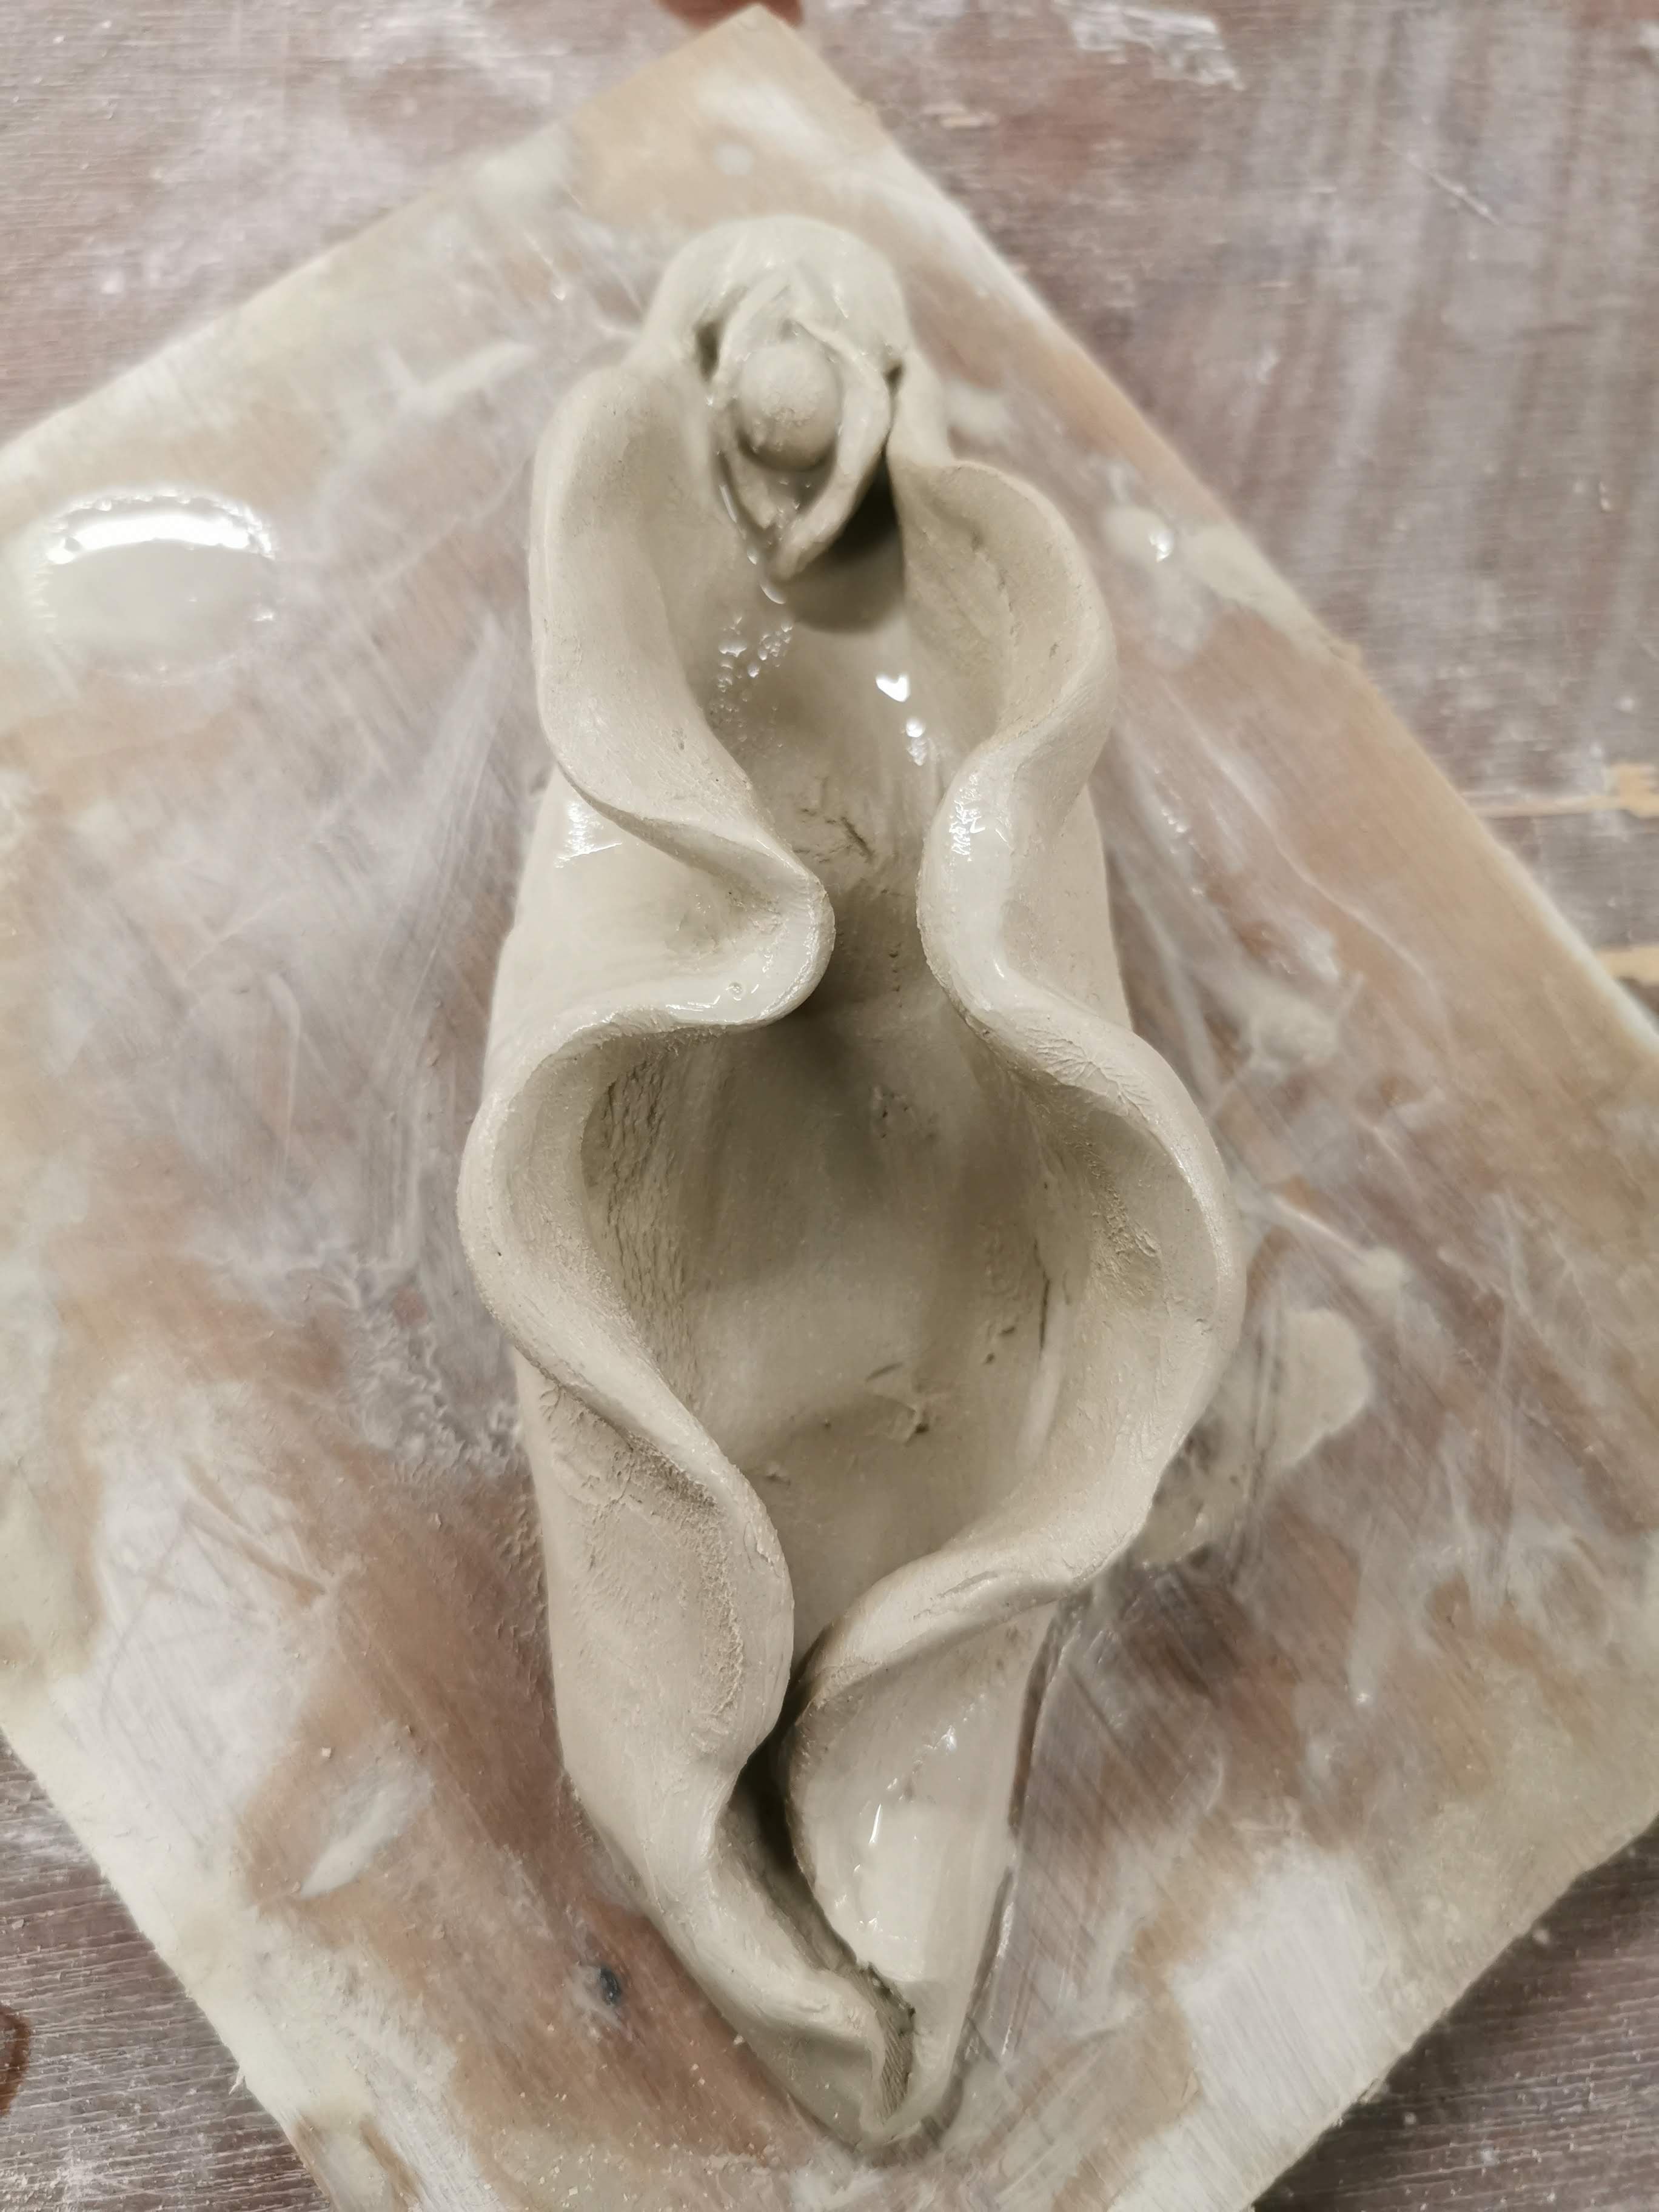
I tried to make a coiled dish (coiling is a technique where you take a sausage of clay and coil it tightly to form the shape you want) but it collapsed, and as I went to squash it and start over it took on the vague shape of a vagina- so I decided to sculpt it into one, ending up with the above piece, which I have since bisque fired. I hope to glaze it soon.

Overall I feel I have a lot to learn- as mentioned I would like to learn to slip cast and throw, and I would also like to improve my sculpting techniques.


Weekly blog 24/06/19 – 28/06/19

river project, UNIT 2, Weekly Summaries, Weekly To Do Lists, Work in Progress

Monday 24/06/19

  • I also picked up one of the big 3D printed bones, shown in the video below
  • The ceramic bones have been fired with the glaze on and I am really happy with how they turned out! The textures are really highlighted by the glaze, and they have that new ceramic sheen which is really satisfying to look at and to handle

This slideshow requires JavaScript.

  • Worked on the aluminium pieces- the dremels are all busted, so I tried using a different tool, but the aluminium was so soft that it clogged up the bit
  • Ended up using a saw, files, and sandpaper to work on them by hand instead- 3 of them just need to be worked into with the engraving tool, and the other 2 still need some work with the hand tools

This slideshow requires JavaScript.

Tuesday 25/06/19

  • Spent most of today painting and sorting out my space for the show- I just need to sweep and mop the floor and get the table and stools in and it is basically ready to go
  • got my table top cut in the wood workshop, and painted it with the first coat of white
  • grabbed the black trestle legs left behind by the BA students for my table

This slideshow requires JavaScript.

  • Picked up another of my large 3D prints- this one looks a lot smoother that the first one, but the technicians were not sure if it was due to using a different 3D printer, or the file type
  • Sent two more giant bones to print
  • Also discussed my Selected Showcase idea with Jonathan, and tested out projecting the video onto the 2 big 3D prints- I really like how it looks but it comes with a set of challenges I will discuss on a separate post

This slideshow requires JavaScript.

Friday 28/06/19

  • Spent the last two days very ill, but got back in today, and did some more work on my 3D prints, as the foundry and metal workshop were both shut

This slideshow requires JavaScript.

Weekly Blog 17/06/19 – 21/06/19

river project, UNIT 2, Weekly Summaries, Work in Progress

Monday 17/06/19

  • spent most the day working the BA degree show private view, so I didn’t have much time to do work
  • I did pick up my 3D printed bones, and worked on them a little though

This slideshow requires JavaScript.

Tuesday 18/06/19

  • Two of the 3D prints I collected yesterday need to be sent to print again, as the supports are where a lot of the detail was supposed to be, and as I remove the support I am also removing the detail, so I will send these to print again this week, and choose somewhere different for the supports to go- as shown in the photos below
  • to make the 3D printed bones look “finished” I have been using pliers, sandpaper, and files to get rid of the supports, and the marks left behind on the bones, although I haven’t been able to completely remove these traces, so I suppose it is just part of the nature of the material
  • the 3D prints are very light, much like the real bones, but feel pretty solid

This slideshow requires JavaScript.

  • the photo below shows the iPad 3D scan and print next to the Einscan 3D scan and print- the quality is vastly different, as you can see- the Einscan actually has the textural surface of the bone, and is much less pixelated looking than the much rougher iPad scan

20190620_140330.jpg

side by side of the iPad scan and Einscan

Thursday 20/06/19

  • I decided to try and work on the aluminum pieces today, but as I clamped one of them in the vice it cracked, and Lindsey had to help me seal the crack with aluminum filler and epoxy resin
  • This will need to be sanded down once the resin filler has dried

This slideshow requires JavaScript.

  • my ceramic bones have been biscuit fired, below is what they looked like once they had been fired, before I glazed them

20190620_113056


Friday 21/06/19

  • glazed my bones today- the photos below show the glazing process, and the bones once the glaze had dried and was ready to be fired again

This slideshow requires JavaScript.

  • to glaze the ceramic bones I had to first mix the glaze very thoroughly, then using the metal tool shown in the photo I had to clamp each bone and dip it into the glaze, shaking it gently to make sure the coating was even, then working the glaze into the textures of the bones with my finger and a brush
  • I then had to remove the glaze with a damp sponge anywhere that the surface of each bone touched the worktop- if you don’t do this, when the ceramic pieces are fired the glaze melts and sticks to the bottom of the kiln, which means the pieces will probably be destroyed when you try to remove them
  • I have circled the places I removed the glaze in red in the photos below to demonstrate

This slideshow requires JavaScript.


Weekly blog- 10/06/19 – 14/06/19

Assessment, river project, UNIT 2, Weekly Summaries, Weekly To Do Lists, Work in Progress

TO DO:

  • Upload last weeks weekly blog
  • create short videos of the 3D scanning process and upload with notes
  • work on Symposium video
  • continue working in Ceramics on the clay bones
  • finish 3D scans with Einscan, edit them on Meshmixer, and send as many as pos to print this week

Monday 10/06/19

  • came in for the afternoon and completed another clay bone in the Ceramics Studio, with another almost finished. I also pressed some clay into 3 of the gel flex moulds before I left, so they should be firm enough for me to pull out of the moulds a little easier in the morning
  • I found that working with the clay when it is harder is closer to working with the wax like I am used to so it was a little easier, although I am going to need to pick up the pace if I want to make them all in both the lighter colour clay, and the terracotta. I wanted to make doubles of each too which means more work. I’ve actually lost one of the original bones, and the pieces of jaw have been difficult to cast well, so that means I have 5 bones to display. This still means that I’ll need to make 20 ceramic bones though if I stick to my original plan of 2 of each in both types of clay, which is a daunting task. I think I might end up only making one of each, and if they break in the exhibition then they break, but I’ll have to see what progress I can make this week.
  • I also went to learning zone, to make some process videos, and work on finishing some of the draft posts saved on my blog, and so far I have finished and published 4, plus this post which I will publish at the end of the week

Tuesday 11/06/19

  • Finished 2 more ceramic bones, and have another 2 half done (one of them is frustrating me so I started another one and kept going back and forth between the two)
  • I now have some bones and a few small things made out of the Earthenware Scarva drying on the drying racks, which I intend to fire when Tas next lights the kilns. I may experiment with glazes on the other objects, to see if I want to glaze the ceramic bones or not.
  • Also sent three of the Einscan 3D bones to print, they should be ready for me to pick up tomorrow
  • Jonathan showed me some tricks on Meshmixer with one of my scans, so hopefully I’ll be able to finish it on my own
  • Picked up the iPad scan 3D print that I sent to print last week, and it looks good- low poly and only the shape, but good as a test

20190611_150836

  • Screenshots of the 3D printing software, Cura, below. You can set the size of the objects here (which I kept the same as the scans, meaning they will be the same size aprox as the real bones) and you can also tell the programme to automatically build supports for your objects which will print with it. We arranged them so that the supports will be touching, to save space and the filament.

This slideshow requires JavaScript.

This slideshow requires JavaScript.

Thursday 13/06/19

  • Was unable to attend the group session due to illness, so instead I added some more bits to a few drafted posts, including this one, and finished another post. I also had a play around on Meshmixer with the more difficult bone (the 3 I sent to print only needed minimal fixes). I have managed to sort it out a bit, but I think I will need Jonathan’s assistance to get it ready to print. (Screenshots below)
  • this same bone is also proving to be tricky to sculpt, due to how big the inner gap is- it is very easy to squash in the soft clay, and prone to falling apart

This slideshow requires JavaScript.

Friday 14/06/19

  • Finished the clay bones I was working on- I now have 1 of each of the main five, and a spare of one of them which are on the drying rack
  • Spent all day working on those, they should be ready to fire next week

3D scanning with Einscan

river project, UNIT 2, Videos, Weekly Summaries, Work in Progress

I mentioned this new 3D scanning available in the 3D workshop briefly in my weekly summary post, but I thought I should probably do a separate post for it, as it is a really exciting piece of kit that I have learnt to use.

This slideshow requires JavaScript.

The Einscan is a piece of kit and accompanying software for 3D scanning, which Jonathan (tutor) mentioned was now available for use in the 3D workshop during our one to one tutorial. You start by setting up the software and kit, by calibrating it- you put the calibration stand onto the turntable, and follow the instructions on the software- rotating the removable board as shown on screen so that the dots align. You rotate the board three times, and in-between each one the turntable rotates it 360 degrees to calibrate the camera. Jonathan (technician) explained that the scanner builds the 3D model by sending out beams of light across the object- the way the light bends around the object is then captured and is used to build the model. Once it was calibrated we used a glue gun to attach the bone to a clear plastic rod embedded in a small piece of wood, much like when I 3D scanned with the iPad and with the photogrammetry- the rod acting as a support. Most of the bones had to be scanned twice, with the bone moved into a different position and glued before being scanned the second time. Jonathan then showed me how to match the two scans up on the software to produce the finished model. (he showed me this on Thursday last week, which is why I ended up with the mutant bone scan, as I didn’t know how to match the two scans up).

I still have one more bone to scan, and possibly one to redo, but I have made really quick progress with this and I’m really happy with how the scans are coming out! As you can see from the video, the details and texture are being picked up much better than they were with the iPad, although not quite as well as the photogrammetry- however this has a much higher success rate and is much faster, so I think the prints I get from these scans will probably be the final ones I put in the show, which is very exciting! I really want to play with these scans on blender- maybe animating them in some way, and I would also like to play around with scale if I have time- printing them as small as possible, and as large as possible. If I have time for these experiments, and if they go well, I am considering applying for the Selected Showcase at our end of year show- I envision displaying a short animation of the digital 3D models, or perhaps a few still images, alongside some huge and tiny 3D prints of the bones.

To Do: 
– Scan the last bone
– clean the scans up on Meshmixer
– send the scans to print


Experimenting with Meshmixer 05/06/19

UNIT 2, Videos, Work in Progress

Meshmixer Sped up Test from Kat Outten on Vimeo.

After my first attempt editing an iPad scan of my bone didn’t go so well (you could see where I dragged the mesh, and this was visible on the 3D print) I was a bit hesitant to try again. This video was originally a 5 and half min screen cap of some playing around with another bone scan, to get a feel for the tools and how the programme works, which I sped up to 2 mins. You can see me trying different tools and playing with softening the shape, which I didn’t end up keeping.

screen cap bone 2 ipad.JPG

This screenshot shows the bone before any editing was done- the raw scan.

I feel a little more confident to use Meshmixer now, and I plan on cleaning the rest of the iPad bone scans up, just to see how the shapes have turned out.

This slideshow requires JavaScript.

Weekly blog 03/06/19 – 07/06/19

Photographs, river project, UNIT 2, Videos, Weekly Summaries, Work in Progress

Monday 03/06/19

  • Took moulds from foundry down to Ceramics studio and started testing them out
  • The clay is much softer than anticipated- I am used to more solid materials such as the wax, so de-moulding has proven more difficult- the clay loses shape as soon as you try to pull it out of the moulds
  • I found leaving the clay in the moulds to dry a little helped, but not much
  • I only managed to get one clay bone finished; I had to do a lot more work to it than I was used to doing with the wax to get it to look right, using the real bone for reference

This slideshow requires JavaScript.

  • I also popped into the 3D workshop to chat about the new scanner with the technician, Jonathan, and ended up doing a scan of one of my bones then and there

This slideshow requires JavaScript.

Tuesday 04/06/19

  • I booked out the photography studio last week for this morning, to photograph all my sculptures so far, with the help of Richard, the technician
  • Ended up coming back after lunch and staying there til 3.30ish, as some pieces proved trickier to photograph

This slideshow requires JavaScript.

  • I took 360 pics of all the pieces except for the two brick casts and the bronze casts, and I plan to animate them into little gifs for my website
  • I learnt a lot about how to light different shapes and materials, which I hope I can try to mimic at home with a flexible desk lamp, fabric, and a white table or sheet- Richard definitely taught me that you don’t always need the fancy equipment available at uni
  • Didn’t get time to go to ceramics again, as planned, so I went to the 3D workshop to do more 3D scans instead
  • I ended up with a few fixable scans, and one mutant scan- I scanned it twice at two different angles, but the software stitched it together wrong, giving me a mutant bone

20190604_164439(0).jpg

Wednesday 05/06/19

  • Made progress on remaking my Symposium video (I lost the entire thing because the programme I was using crashed)
  • Had to go to work in the evening

Thursday 06/06/19

  • Morning group tutorial- we discussed show details and I am happy with the space I have been allocated
  • Edited one of the iPad bone scans and sent it to print
  • Made some more progress on remaking the symposium video

Friday 07/06/19

  • Visited Jonathan in 3D and scanned the bones that went wrong on Tuesday- he showed me how to do multiple scans and match them up to get a better 3D model
  • I have one bone left to scan- I just need to do that and clean up the scans on MeshMixer and they will be ready to 3D print

I Can’t Help the Way I Feel- My Fat Body

UNIT 2, Videos, Work in Progress


An artwork exploring my relationship with my body existing in a culture that simultaneously glorifies and vilifies food and sells diet culture to the masses. Interspersed with clips of my own body are clips of the John Isaacs sculpture “I Can’t Help The Way I Feel”, previously on display at the Medicine Now exhibit at the Wellcome Collection in London, which depicts a vaguely human form (without the head, arms, and genitals) engulfed in an explosion of fat. This video piece is both a response to that work, and a work in it’s own right. Ideally I hope to display this in an exhibition with works made by other fat artists, projected onto a wall at a large scale, so that it cannot be ignored by the viewer. I would also like to make casts of various parts of my body to display in the space, so that the audience is confronted by other kinds of body to what we are force fed in the media-  tiny bodies, with only certain parts deemed acceptable to be large (i.e. bums and boobs on women, usually- but only if they are smooth and free of cellulite and stretchmarks).

A large part of my struggle with my body image comes from the outside world, from society as a whole. The footage of the bacon roll (a Greggs advert) represents the constant imagery of fast food that we are bombarded with, from television adverts to posters and even giant billboards. Being in London, particularly, means we are constantly surrounded by this, as the city is saturated (pardon the pun) with images of food. At the same time we are also assaulted with images of the “perfect” body, whether that is on the front of every magazine, or for diet pill and fitness regime ads on the tube. This constant war between the food we are reminded is unhealthy, and images that show bodies like mine as the “before” all contribute to my twisted self image, and have fueled my disordered eating for years.

The “we’ve shed the pounds” footage is not from a health or fitness shop though- it is from the window of an EE phone shop. Clearly they are advertising that they have made their products cheaper, but the wording and the imagery of the scales alludes to weight loss- on a shop that has nothing to do with weight! I thought that was pretty ridiculous, which is why I filmed it and included it in this piece. I may also record some footage of the diet and fitness ads on the tube next time I use the underground and add it to the video at a later date, as I feel that would fit with the work. I would also like to play around with adding sound to the piece- I considered recording myself reciting some of my writing and poetry on my body, but I don’t really like the sound of my voice, and someone else’s voice would not work as it is a personal piece. I feel music would be distracting, so I might ask some people I know who work with sound to help me come up with something, as I feel the work could benefit from it.

This is definitely a work in progress, and I am excited to see what I can do with it in the future! When I finish my MA I think I would like to get a group of fat artists together to put on an exhibition and run some drawing workshops in the space, inspired by my original Fat Bodies Drawing Workshop for the Post Grad Community at my uni, but bigger, better and fat artist only! Perhaps this work will be part of it, but perhaps I may have moved on to a different piece by then.