THIS IS NOT A SHOW, Virtual Exhibition WCCD X Pineapple Black Arts

Exhibitions, river project, WWCD

A little virtual tour of the online exhibition THIS IS NOT A SHOW, showcasing the work of over 50 working class artists and creatives from the Working Class Creatives Database at Pineapple Black Arts, with a brief look at my work included in the show.
‘𝔗π”₯𝔦𝔰 𝔦𝔰 𝔫𝔬𝔱 π”ž 𝔰π”₯𝔬𝔴. 𝔗π”₯𝔦𝔰 𝔦𝔰 π”ž π”°π”±π”žπ”±π”’π”ͺ𝔒𝔫𝔱 𝔬𝔣 𝔦𝔫𝔱𝔒𝔫𝔱.’
With workingclasscreativesdatabase.co.uk/
⚑️launched on pineappleblack.co.uk/index.php/pbvarts/⚑️

οΏ½The Working Class Creatives Database is a platform highlighting the work of people who are working class, giving a supporting structure to people that are involved in the arts.

οΏ½As of 2020, only 16% of the workforce in creative industries identify as being from working-class backgrounds. By creating a platform for working-class creatives this begins to readdress these issues within the sector through creating a voice for those that are otherwise outsiders.

Special thanks to @pineappleblackarts for giving us a virtual space and @highbrowart for the poster design.

Experimenting with Meshmixer 05/06/19

UNIT 2, Videos, Work in Progress

Meshmixer Sped up Test from Kat Outten on Vimeo.

After my first attempt editing an iPad scan of my bone didn’t go so well (you could see where I dragged the mesh, and this was visible on the 3D print) I was a bit hesitant to try again. This video was originally a 5 and half min screen cap of some playing around with another bone scan, to get a feel for the tools and how the programme works, which I sped up to 2 mins. You can see me trying different tools and playing with softening the shape, which I didn’t end up keeping.

screen cap bone 2 ipad.JPG

This screenshot shows the bone before any editing was done- the raw scan.

I feel a little more confident to use Meshmixer now, and I plan on cleaning the rest of the iPad bone scans up, just to see how the shapes have turned out.

This slideshow requires JavaScript.

SYMPOSIUM 2

2ND YEAR PRESENTATIONS, Assessment, river project, UNIT 2, Videos

I originally made this video for the Symposium 2 for when we were supposed to present the videos to the rest of our classmates, but as I was just finishing working on it (and despite saving the file every five minutes or so) the Mac I was working on crashed and I lost about 4 hours worth of work. This all happened at 4am, 6 hours before we were due to present to the class, and so I ended up giving a verbal presentation with some of the images I used in the video to demonstrate what I was talking about. This was a very stressful and anxiety inducing situation, but I am very pleased that I did it, and that Jonathan and Ed were understanding and allowed me to present the way I did.

This video is a little bit longer than it was supposed to be, and even that was a struggle, as I found I had so much I wanted to show and say. I am fairly pleased with the outcome though, and I feel that it captures my process and research quite well.

3D Scanning using iPad 14/01/19

river project, UNIT 2, Videos, Weekly Summaries, Work in Progress

This video is of the Digital Media Technician Adamina demonstrating how to use the 3D scanning software and piece of kit for an iPad. This is one of the more basic 3D scanning techniques available, and as you can see the scan hasn’t picked up the details of the bone, only the rough shapes.

The next step for me is to install a free programme called MeshMixer and cut off the pen, as it came up in the scan, and seal up the piece. Then it will be ready to be 3D printed on Monday next week.

This slideshow requires JavaScript.

These photos show the set up in the studio, including white backdrop, plinth, and lighting set up. We suspended the bone from nylon wire so that we could scan the whole object, and used a pen and blueback underneath it for stability- we needed it to be still for the scanning to work.

Next Steps:

  • download MeshMixer and clean up the scan for printing
  • meet with Adamina next Monday (I have booked an appointment with her) and send the scan to print
  • hopefully next week we will also experiment with photogrammetry, which she mentions in the video. This process is a bit more lengthy and complicated- I will have to borrow a camera and lens from uni, and photograph the object multiple times from multiple angles, and then upload these photos to a specialist programme that stitches everything together to create a 3D model. This will take a fair bit of time, and I might still need to work into the objects on the software to clean them up before we can send them to the 3D printer

Glass Wax Tests 11/01/19

Photographs, river project, UNIT 2, Videos, Weekly Summaries, Work in Progress

This slideshow requires JavaScript.


Some photos taken of the process of casting with glass wax- the melting glass wax, the casts full of glass wax, and photos of the failed jaw bone casts and brick cast. Casting the brick hollow with glass wax is proving troublesome- the wax is very brittle and the sides of the cast keep breaking as I try to de-mould it. I will try one more time to cast it hollow but a bit thicker and if that doesn’t work I might have to cast it solid instead. The jaw bone pieces kept failing as the glass wax is too thick and not hot enough to flow all the way through the moulds- I will try to get it hotter next time, but I have to be careful in case the wax gets too hot and the colour changes.

Video demonstrating the properties of glass wax and the casting process.
I wanted to explore the properties and materiality of glass wax, and these are the results so far.
Clip 1: the chunk of unmelted glass wax, demonstrating what it looks like before it is melted and cast- you can see how the light refracts and passes through it.
Clip 2 and 3: the glass wax as it melts, showing the viscosity and how it stretches and flows much like real glass when in molten form. It is very different to other waxes I have used in the past.
Clips 4 and 5: the first attempts at casting the jaw bones in glass wax- as you can see the wax didn’t flow completely through the moulds as it was not hot enough and cooled too fast. I will try again but with the wax much hotter so hopefully it will flow through the moulds properly.
The rest of the clips: the other bone casts in glass wax.

This slideshow requires JavaScript.

These photos show the second attempt at casting the jaw bones in glass wax (still not hot enough), the glass wax casts all together, the broken hollow brick cast (the details were captured beautifully, it’s just a shame that the sides broke), and one of the glass wax casts lit by Jonathan’s phone torch- as an experiment to see how light travels through them. I think going forwards I would like to photograph the glass wax pieces with a light source beneath them like this, but using a more professional set up.

Notes on glass wax:

  • Properties- melts differently to waxes I have used in the past (i.e. the green and orange waxes used in uni, soy wax, paraffin wax, beeswax)
  • As it melts it goes quite stringy and is still very thick and viscous, can be stretched into glass-like threads that look like nylon thread
  • It sets VERY quickly and needs to be quite hot to pour well, but you have to be super careful not to overheat it as it can make the wax change colour
  • You can add oil paint as a pigment to glass wax, but I’m more interested in how it looks originally- like a translucent glass
  • I might do one or two in colour just to see what it looks like, but we’ll see
  • It is quite brittle- I tried to make a hollow brick cast and the sides shattered (like glass) as I tried to remove the cast- if I retry this I will need to make it thicker
  • It picks up detail really beautifully and I’m definitely impressed
  • I need to redo the jaw bones in glass wax as the wax wasn’t hot enough and as a result didn’t flow through the moulds properly


Using an Engraving Tool on the Bronze Brick

river project, Videos, Work in Progress

Process Video: Using an Engraving Tool from Kat Outten on Vimeo.

This short clip shows how I have been using an electric engraving tool to work details back into the surface of the brick wherever it was lost due to the casting process. The shiny parts are where I have used an angle grinder or Dremel tool previously to get rid of runners, risers, and other imperfections on the surface of the bronze. I have to take frequent breaks when using these tools, and swap hands often, as the vibration from the tool makes my wrists ache, but otherwise it is fairly simple to use. As always I follow safety protocol, wearing a visor, ear protection, dust mask, and gloves to protect myself, as well as having the extractor fan on and handling all tools safely and responsibly.

Work in the Interim Show

Exhibitions, river project, Videos

Video of my work in the show, including close up clips of each finished bronze piece, and a clip of the whole display.

This slideshow requires JavaScript.

The two photos above show the set up for the exhibition, and one of the visitors interacting with my objects. The back row of objects are the real bones that each bronze was cast from, with the cast displayed in front of each one. I chose this format as I wanted to see whether viewers would be more likely to pick up the bones or the bronze casts, and i wanted it to have an almost museum-like feel to the display. I did put in the artwork description “Please Touch Me” but as it wasn’t very visible not many visitors did pick up or interact with the objects like I wanted. As well as the label not being very visible I also feel that the gallery space, as a concept, probably contributed to the lack of interaction- in most galleries and museums the audience is highly discouraged, if not prohibited, from touching the artworks. This is something I am very much against, and want to challenge with my work, so going forwards I think I need to make it clearer to the audience that they can and should pick up and touch my work. I will probably do this through larger and clearer signage, but I will have to see what happens at our next show, and what is possible with the space we have.

The feedback I got from people who did pick up and touch my work was overwhelmingly positive- I was asked about my walks and how/where I collected the objects, I was questioned about the process of casting, and about the ideas behind the project. Although my display was simple I was very pleased with how it looked, and I thought that it fit well with my classmates work, although our work was quite different nothing looked out of place and it was visually cohesive. I did find it difficult to stay in the room for more than five minutes at a time though, due to the combination of sounds from my classmates work. It was quite overwhelming so I found myself frequently wandering around the other spaces in the exhibition whilst invigilating.

Applying the Patina

river project, Videos, Work in Progress

A patina can refer to the natural colouration that happens over time to bronze, as the copper in the alloy reacts to oxygen, or it can refer to a man-made process where a chemical mixture is heated onto the surface of the bronze, to achieve different colours and effects. I am referring to the man-made process, and the above video shows foundry technician Becky Stevenson demonstrating how to apply a patina to one of my bronze pieces.

I then replicated what she had shown me, and once the pieces had cooled down I then applied two coats of wax, by hand using a cloth, to each piece to seal the colour.

This was definitely one of the more fun parts of the whole casting process! It was a chance to experiment and play with the different colours and effects that the application of heat and layering of the patina could achieve and I am super happy with how they turned out!

Wax Casts

Photographs, river project, Videos, Work in Progress

This slideshow requires JavaScript.

Photos of the wax casting process- melting the wax in a saucepan before leaving it to cool to pouring temperature (the wax needs to be cool enough that it coats the side of the pan), then pouring into the secured moulds, including the larger brick mould, before de-moulding and removing excess wax/working the details back in.

Video of two wax casts, fresh from the mould- you can see that there is excess wax that needs to be removed, and some of the details need to be worked back in to the casts.

Video made up of a clip showing the second, larger batch, of wax casts fresh from the moulds, followed by a clip of me working on one of these casts to remove excess wax and work a hole back into the cast to mimic the original bone. The final photo is of the wax cast from the previous clip next to the original bone I cast it from- you can see that I have worked some of the details lost during the hot rubber mould process back into the wax cast.

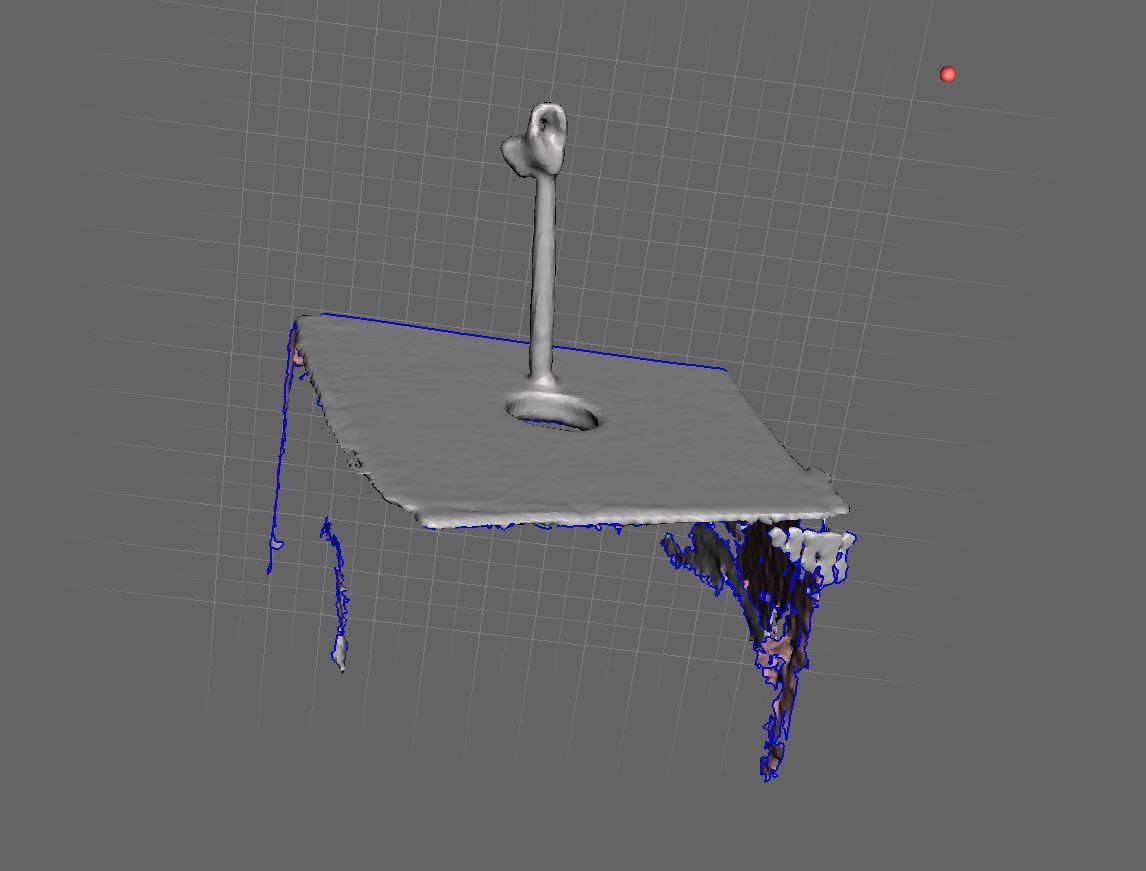
The two clips in this video show the first hollow wax cast of the brick I found on the river, and the second cast next to the original brick- you can see how the hot rubber mould picked up most of the detail from the brick, and how that has translated to the wax casts. You might notice some lines on the casts- this is because to make a hollow cast you need to pour in the wax slowly and roll the mould gently around to ensure the wax coats the mould properly- I did this too slowly so there are lines visible. Next time I use the mould I will be careful to pour the wax faster to avoid this happening- I may melt these two casts down and redo them.Β  The brick casts need to be hollow as to make a solid bronze of that size would be too costly, and too heavy. I will either have to leave the hole in the bottom, or weld a small piece of metal over the hole, but this is something I will tackle when I get to that stage.

Unfortunately this was all I was able to get done before the workshops closed for the break, but I am looking forward to getting back into the foundry/plaster room and continuing my work! The plan is to make at least two of each bone in wax, and then make at 2 – 4 large moulds to go into the kiln and then be poured, as I want a copy of each bone in aluminium and in bronze. I have also been shown a material called glass wax, which is used in the film industry to make objects that mimic glass, and ifΒ  I can afford it I would like to experiment with this medium as well, as it will give me another material and colour to analyse.

BISCUIT Projected

Exhibitions, Group Project, Videos

IMG_0030

Our short film inspired by Jess Thom, BISCUIT, was projected onto the new hall of residence next to Camberwell College of Arts for the official opening night of the new building! This means it was potentially seen by everyone in attendance, including Jess Thom, the Dean of Camberwell, and Grayson Perry! The photo was taken by Jonathan and sent to our group, as we weren’t aware that it was happening on the night. There was no sound due to it being projected, but I’m very proud that our work was shown to such a large audience!