3D Scanning using iPad 14/01/19

river project, UNIT 2, Videos, Weekly Summaries, Work in Progress

This video is of the Digital Media Technician Adamina demonstrating how to use the 3D scanning software and piece of kit for an iPad. This is one of the more basic 3D scanning techniques available, and as you can see the scan hasn’t picked up the details of the bone, only the rough shapes.

The next step for me is to install a free programme called MeshMixer and cut off the pen, as it came up in the scan, and seal up the piece. Then it will be ready to be 3D printed on Monday next week.

This slideshow requires JavaScript.

These photos show the set up in the studio, including white backdrop, plinth, and lighting set up. We suspended the bone from nylon wire so that we could scan the whole object, and used a pen and blueback underneath it for stability- we needed it to be still for the scanning to work.

Next Steps:

  • download MeshMixer and clean up the scan for printing
  • meet with Adamina next Monday (I have booked an appointment with her) and send the scan to print
  • hopefully next week we will also experiment with photogrammetry, which she mentions in the video. This process is a bit more lengthy and complicated- I will have to borrow a camera and lens from uni, and photograph the object multiple times from multiple angles, and then upload these photos to a specialist programme that stitches everything together to create a 3D model. This will take a fair bit of time, and I might still need to work into the objects on the software to clean them up before we can send them to the 3D printer

Glass Wax Tests 11/01/19

Photographs, river project, UNIT 2, Videos, Weekly Summaries, Work in Progress

This slideshow requires JavaScript.


Some photos taken of the process of casting with glass wax- the melting glass wax, the casts full of glass wax, and photos of the failed jaw bone casts and brick cast. Casting the brick hollow with glass wax is proving troublesome- the wax is very brittle and the sides of the cast keep breaking as I try to de-mould it. I will try one more time to cast it hollow but a bit thicker and if that doesn’t work I might have to cast it solid instead. The jaw bone pieces kept failing as the glass wax is too thick and not hot enough to flow all the way through the moulds- I will try to get it hotter next time, but I have to be careful in case the wax gets too hot and the colour changes.

Video demonstrating the properties of glass wax and the casting process.
I wanted to explore the properties and materiality of glass wax, and these are the results so far.
Clip 1: the chunk of unmelted glass wax, demonstrating what it looks like before it is melted and cast- you can see how the light refracts and passes through it.
Clip 2 and 3: the glass wax as it melts, showing the viscosity and how it stretches and flows much like real glass when in molten form. It is very different to other waxes I have used in the past.
Clips 4 and 5: the first attempts at casting the jaw bones in glass wax- as you can see the wax didn’t flow completely through the moulds as it was not hot enough and cooled too fast. I will try again but with the wax much hotter so hopefully it will flow through the moulds properly.
The rest of the clips: the other bone casts in glass wax.

This slideshow requires JavaScript.

These photos show the second attempt at casting the jaw bones in glass wax (still not hot enough), the glass wax casts all together, the broken hollow brick cast (the details were captured beautifully, it’s just a shame that the sides broke), and one of the glass wax casts lit by Jonathan’s phone torch- as an experiment to see how light travels through them. I think going forwards I would like to photograph the glass wax pieces with a light source beneath them like this, but using a more professional set up.

Notes on glass wax:

  • Properties- melts differently to waxes I have used in the past (i.e. the green and orange waxes used in uni, soy wax, paraffin wax, beeswax)
  • As it melts it goes quite stringy and is still very thick and viscous, can be stretched into glass-like threads that look like nylon thread
  • It sets VERY quickly and needs to be quite hot to pour well, but you have to be super careful not to overheat it as it can make the wax change colour
  • You can add oil paint as a pigment to glass wax, but I’m more interested in how it looks originally- like a translucent glass
  • I might do one or two in colour just to see what it looks like, but we’ll see
  • It is quite brittle- I tried to make a hollow brick cast and the sides shattered (like glass) as I tried to remove the cast- if I retry this I will need to make it thicker
  • It picks up detail really beautifully and I’m definitely impressed
  • I need to redo the jaw bones in glass wax as the wax wasn’t hot enough and as a result didn’t flow through the moulds properly


Casting the Jawbone

Photographs, river project, Work in Progress

This slideshow requires JavaScript.

Casting the jawbone raised a host of issues that I didn’t realise would be a problem, but hopefully it will work out in the end. Before we could make a hot rubber mould of the jawbone Becky (the technician) and I decided to make a plaster cast of the jaw, as we felt it would be too fragile to make a hot rubber mould from directly.

STEPS

  1. Before we could begin casting I had to fill in the holes in the jaw (where the rest of the teeth originally were) with soft wax, so that it would be easier to cast. I also used a little superglue to secure the two teeth- we were worried that they may have come out of the jaw when we de-moulded it, so this was a preventative measure.
  2. I then pressed the jaw carefully into some clay and built up clay walls around it, and then applied a few layers of vegetable oil to the jaw to help release it from the mould once the alginate had set
  3. I mixed up a small amount of quick set alginate which I poured into the clay mould and left to set
  4. Once this had set I carefully removed the clay and rinsed the jaw and alginate, before greasing it up with more oil, and building up clay walls around it
  5. Another batch of quick set alginate was then poured over this, and left to set
  6. The clay was then removed, and the two halves of the mould separated and the jaw carefully removed.
  7. After cleaning both halves of the mould I fit them together and secured them with elastic bands, and was then ready to pour fine casting plaster into it
  8. The first attempt didn’t work very well and only the thickest section of the jaw came out, so for the second attempt after pouring in the plaster I moved the mould around to encourage the plaster to flow through the whole mould
  9. Once I opened the mould up I realised one half had not worked out, and the other half, where all the detail was, was too thin- to fix this I cut up scrim and layered that and some more plaster on top of it until it was thicker and stronger
  10. I then de-moulded it and created a hot rubber mould from that plaster cast. Because the detail was lost on one side I decided to make a flat mould, rather than a round one that needed to be cut open, to save materials
  11. The final photo on the slideshow is of the original jaw, first failed plaster cast, second plaster cast, and de-moulded wax cast of the jaw- as you can see there are a lot of details that need to be worked back into the wax by hand, but I am confident that it is doable

Unknown Landscapes/ Impromptu Pop up Show

Exhibitions, Photographs, river project, Videos

The above video is of my “Unknown Landscapes” piece in the end of term pop up exhibition ‘Impromptu’ held in uni, with work from both first and second year students. I wasn’t involved in the set up of the exhibition so I had no idea the video works would be displayed like this, with each screen slightly delayed from the previous screen to create this effect- but I really like it and think it is really effective in showing off my work!

This slideshow requires JavaScript.

The images show my work at different stages on the screens, as well as shots of my classmates’ work. The exhibition was small but well curated and I feel that all the pieces worked well together in the space, despite being very different.

BISCUIT Projected

Exhibitions, Group Project, Videos

IMG_0030

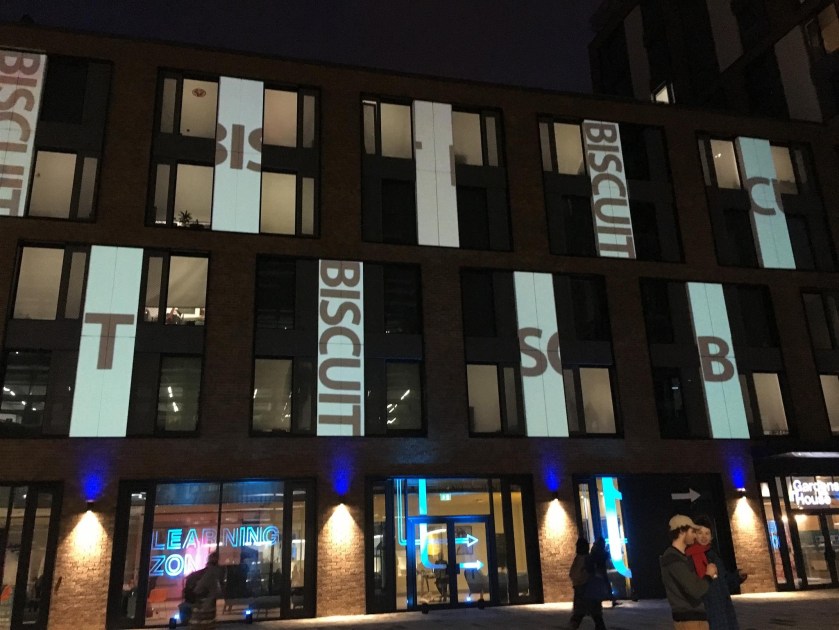
Our short film inspired by Jess Thom, BISCUIT, was projected onto the new hall of residence next to Camberwell College of Arts for the official opening night of the new building! This means it was potentially seen by everyone in attendance, including Jess Thom, the Dean of Camberwell, and Grayson Perry! The photo was taken by Jonathan and sent to our group, as we weren’t aware that it was happening on the night. There was no sound due to it being projected, but I’m very proud that our work was shown to such a large audience!